1. How to disassemble an old Leading Edge
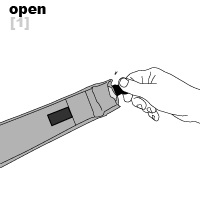
Open the end of the leading edge.
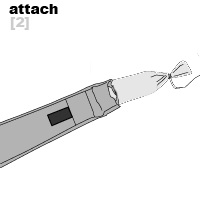
Attach a flying line at the end of both sides of the Leading Edge. Make sure the lines are attached correctly in order to pull the Leading Edge out and at the same time the flying lines in.
Attach a flying line at the end of both sides of the Leading Edge. Make sure the lines are attached correctly in order to pull the Leading Edge out and at the same time the flying lines in.
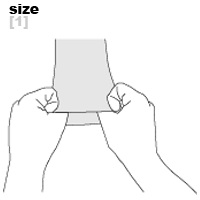
2. How to measure a Leading Edge
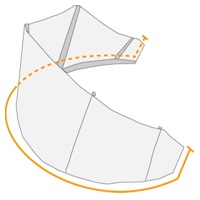
Leading edge bladders are measured from tip to tip as illustrated. If your leading edge bladder has been removed from the kite you can measure the original bladder from tip to tip. If you don't have the original bladder or the bladder is still in the kite, you'll can measure the kite. Follow the instructions below that apply to your kite's set up.

Leading edge bladder with wrap around elbows.
Open the ends of the bladder sleeve. Measure the leading edge/wingtip sleeve from end to end. Measure around the outside of the arc formed by your leading edge, be sure that the measuring tape runs around the outside of the elbows where your leading edge turns onto the wingtip.
Choose a leading edge bladder that measures the same length or longer than the measurement that you came up with. If you are at all unsure of your measurement, round up to the next size offered. An oversized bladder works, an undersized bladder will not work.
Preaching oversized?
Remember that you can always use an oversized bladder in a smaller application. When traveling we recommend taking a leading edge bladder that is long enough to fit your largest kite. Should you need to use the bladder in a smaller kite you can invert the bladder ends back inside the bladder until it is the desired length. Inverting up to 8 feet at each end is perfectly reasonable if you don't have access to a bladder that is the correct length.
3 How to mark a valve location
The U-STICK bladder system allows you to assemble a bladder to fit any kite. The system is quick and simple regardless of the number of valves your leading edge uses. Follow the illustrations below to see how to determine where you should place the valves when assembling a leading edge bladder.
Make sure that the U-stick bladder is larger than the original bladder in both length and diameter. You can easily confirm that the U-stick bladder is larger by laying the original bladder on top of the U-stick bladder and centering it.

Mark the exact location(s) of the valve(s) with a felt tipped marker. Use the original bladder as a guide to decide where to place the valves in relation to the sides of the bladder. Once the valve position(s) are properly placed you can attach the U-STICK valves according the the valve attachment instructions below.

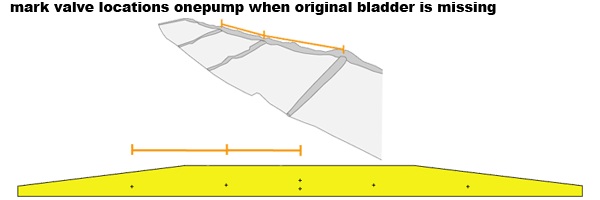
Placement of multiple valves on a one-pump style leading edge bladder is very simple. as with any leading edge, lay out the original just above the AIRTIME bladder and transfer the locations of the valves. using the original bladder as a guide, mark the exact location(s) of the valve(s) with a felt tipped marker. if an original valve is centered vertically on the leading edge you will want to center the U-STICK valve on the U-STICK bladder as well. once the valve position(s) are properly placed you can attach the U-STICK valves according the the valve attachment instructions below.
4.
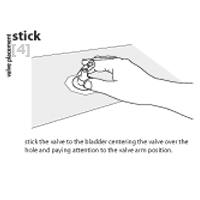
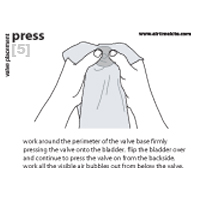
How to attach a valve
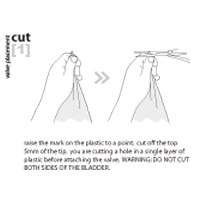
After you have setup the precise places of the valves. Carefully cut out a small hole where the valve will be placed. Be careful not to cut both sides.
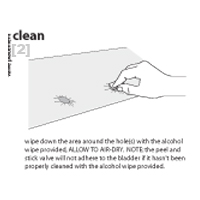
Wipe down the area around the marking(s) with the alcohol wipe provided, ALLOW TO AIR-DRY. the peel and stick valve will not adhere to the bladder if it hasn't been properly cleaned with the alcohol wipe provided.
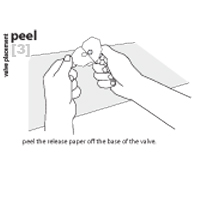
Peel the release paper off of the base of the valve. Don't touch the sticky backside.
After you have setup the precise places of the valves. Carefully cut out a small hole where the valve will be placed. Be careful not to cut both sides.
Wipe down the area around the marking(s) with the alcohol wipe provided, ALLOW TO AIR-DRY. the peel and stick valve will not adhere to the bladder if it hasn't been properly cleaned with the alcohol wipe provided.
5.
How to assemble a new Leading Edge
If the U-Stick bladder is longer than the original, you can shorten the length of the bladder by inverting the ends of the bladder back inside themselves.

Start at the center and stack half the bladder like an accordion leaving the bladder end on top. place the stacked bladder in front of the bladder access opening at the center of the leading edge.

Run a flying line in a wingtip of the leading edge sleeve and out the bladder access opening at the center of the leading edge. Tie the flying line off to the end of the bladder.

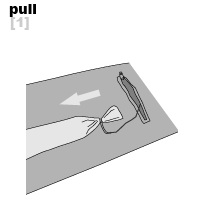
Pull the bladder into the leading edge by the flying line, watch that the bladder feeds in cleanly. Repeat this and the previous two steps to install the other half of the bladder into the other side of the kite.

Make sure the bladder ends extend all the way to the end of the bladder sleeve and that the bladder ends are properly secured when the sleeve ends are closed.
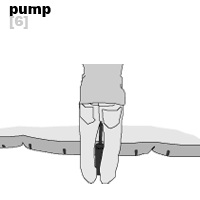
After seating all the valves in their holes slowly inflate the leading edge. Watch for any soft wrinkled areas that could indicate a twisted bladder. If the bladder is twisted or the ends not properly seated the bladder may be damaged upon full inflation.